Configuring Securosys Authorization App
After registering an approver (or skipping the registration) the app can be configured further.
The configuration can be accessed by clicking the ⋮ button in the top right. Within the menu there are 3 configuration options:
Application Settings
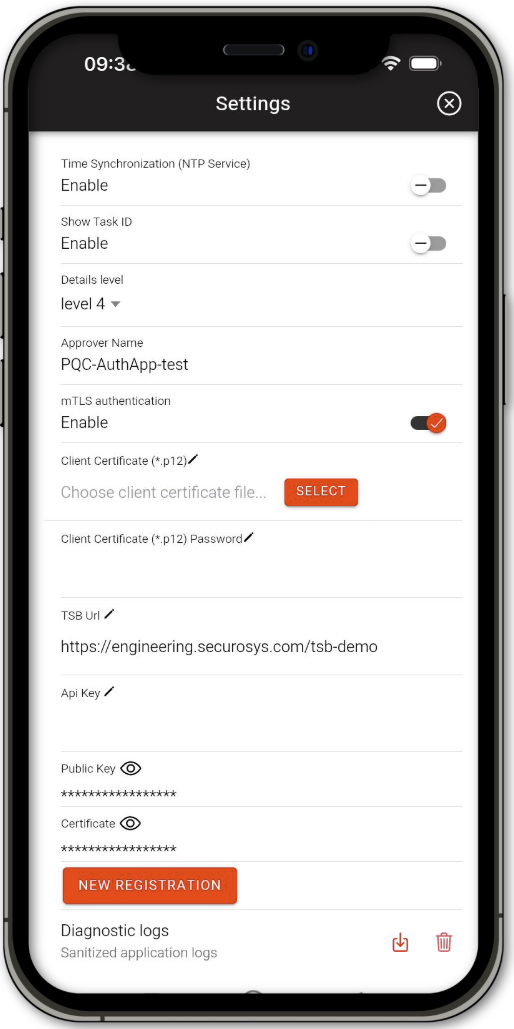
Within the Settings menu, it's possible to configure the application, the Approval settings, download logs, configure mTLS and more.
The following settings can be configured in the settings page:
| Application Setting | Description |
|---|---|
| Whitelist Certificate/public key | By clicking on the + button, one can select a certificate or public key to be whitelisted. Remove the whitelisted object with the - button. Supported algorithms: RSA, EC, Ed25519 |
| Time Synchronization (NTP Service) | This setting allows to define an NTP Host such as e.g. time.google.com. |
| Show Task ID | Enable to show the ID of the fetched tasks. |
| Details Level | Set the level of details to be provided on tasks. |
| Approver Name | Shows the name of the registered Approver. Can only be changed via the New Registration procedure. |
| mTLS Authentication | Enable this setting when mTLS is required to authenticate to your TSB. Click on SELECT to select your client certificate *.p12 file and specify the file password if required. See TSB - Configure TLS. |
| TSB URL | URL to the Transaction Security Broker the application is connecting to. Can only be changed by going through the New Registration procedure. |
| API Key | Optional API Key required if the Transaction Security Broker requires an approverToken API key for authentication. |
| Public Key | Shows the Public Key of the registered approver. Tied to the Approver and is only changed when registering a new Approver. See New Registration for more information. 1. To show the Public key press the  button. button. 2. If biometric authorization is required to show the public key, authorize yourself. 3. The public key is shown. 4. Optionally you can copy the public key to clipboard by pressing the button COPY TO CLIPBOARD. |
| Certificate | Shows the Certificate of the registered approver. Tied to the Approver and is only changed when registering a new Approver. See New Registration for more information. 1. To show the certificate press the button. 2. If biometric authorization is required to show the certificate, authorize yourself. 3. The certificate is shown. 4. Optionally you can copy the certificate to clipboard by pressing the button below COPY TO CLIPBOARD |
| New Registration | Click on the button to start a new registration procedure. |
| Diagnostic Logs | Click on the download button to save the application logs or delete the existing logs contained within the application. |
| Keep Logs For | Specify the log retention time. |
Some settings are described in more detail in the chapters below.
Details Level Setting
This setting defines the level of which the DETAILS Tab shows when opening an approval task menu. For more information on the Details Tab, please see this tutorial.
| Details Level | Description |
|---|---|
| level 4 | Default setting. It will only show the details such as the payload, payloadType, signKeyName, signatureAlgorithm and the signatureType as well as timestamping information such as timestamp, timestamp Signature. For all possible details see TSB Swagger config Task Level 4 |
| level 5 | Includes all details from level 4. Adds an button to the key details in the DETAILS Tab of the approval task menu. It reveals the Key Attributes in xml format. |
| level 6 | Includes all details from level 5 with the addition of requestStatus. |
New Registration

This button allows changing the Approver or registering a new approver (if onboarding has been skipped). Clicking the button leads you to the registration screen that you saw after the initial app install.
There you can register a new approver (see this guide), or a restore of an existing approver (see this guide).
To cancel the new registration process and to go back to your existing registration, click Cancel.
Diagnostic Logs
The diagnostic logs help diagnose issues with the Authorization App. The logs are enabled by default and are retained for 7 days. Users can download and save the logs from the application to their directory of choosing by clicking on the download button. Downloading the logs does not delete them on the application. If the application logs are taking too much storage space, they can be deleted.
The logs are saved in .json format and include information about the hardware on which the application is running,
as well as task information, connection information and more. The Task logs correspond to the
Transaction Security Broker logs. They do not include any metadata, but instead have a task ID attached for each
operation "id":"LOG-MT6579AU-AC5N". This ID corresponds to the ID on the TSB the application is connecting to.
TSB admins can diagnose the Authorization App issues by searching for the ID within the connected TSB.
Example logs:
{"id":"LOG-MT6579AU-AC5N","timestamp":"2026-08-23T18:30:31.638Z","level":"info","event":"TSB: Fetch tasks","details":{"operation":"Fetch tasks","configurationType":"tasks","endpoint":"/v1/filteredAllApprovalTask","status":200,"durationMs":495,"taskCount":1}}
{"id":"LOG-MT657JMO-O3YY","timestamp":"2026-08-23T18:30:45.024Z","level":"info","event":"TSB: Approve task","details":{"operation":"Approve task","configurationType":"tasks","endpoint":"/v1/approval","status":200,"durationMs":1941}}
Biometric Authentication Settings
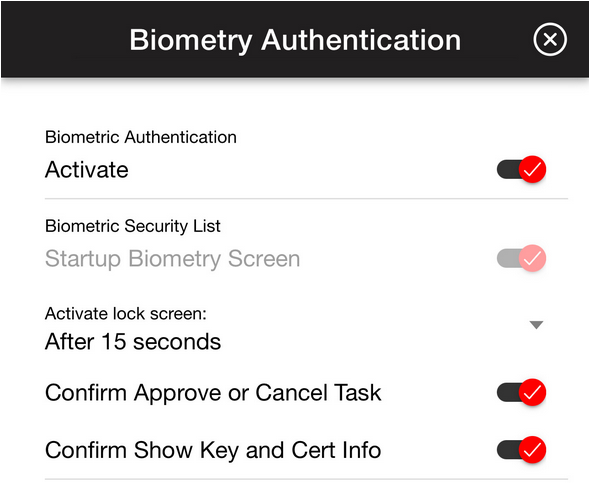
Clicking on Biometry within the configuration menu, leads to the Biometric Authentication configuration page.
Biometric Authentication can be activated to be required at the start of the application. Only possible if biometric authorization is already in use for the device (takes the device biometrics).
To enable, click the button next to the Active Biometric Authorization.
After enabling the biometric authorization it is possible to more granularly define which operations require the biometric authorization.
| Biometric Authentication Options | Description |
|---|---|
| Startup Biometry Screen | With active biometric authorization set to enabled it is required to authenticate at the startup of the application. This operation cannot be disabled without disabling Active Biometric Authorization. |
| Activate Lock Screen | 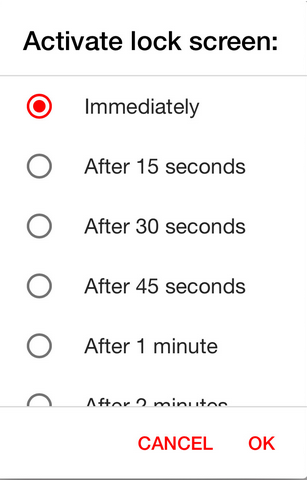 Clicking on the setting will open a selection box with multiple choices. Please choose the time after which you would like the application to require login with the biometry authentication again. Clicking on the setting will open a selection box with multiple choices. Please choose the time after which you would like the application to require login with the biometry authentication again. |
| Confirm Approval or Denial of a Task | When enabled, biometric authorization is required when approving or canceling either an operational or key management approval task. |
| Confirm Show Public Key or Certificate | When enabled, biometric authorization is required when clicking on the button to show the Public Key or Certificate of the registered approver. |
Migration and Backup
Clicking on the Migration within the configuration menu, initially leads to the migrate data page, while backup / restore page is accessible as a different tab.
Both options provide the ability to migrate, restore or backup all application settings, which is useful in cases of hardware upgrade or loss.
With the help of the Approver Manager, it is possible to restore an Approver even if no app backup is available. See this tutorial for more details.
Migrate Data
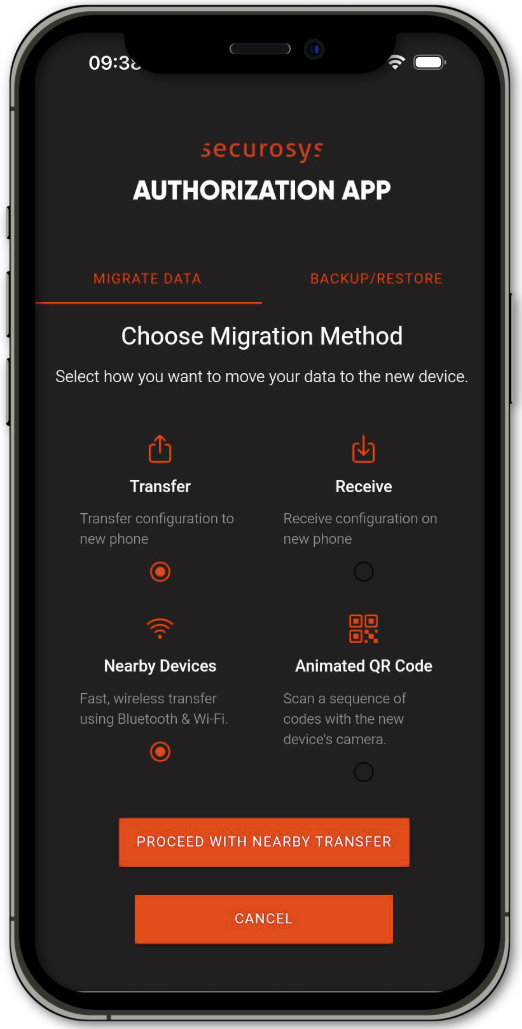
Migrating data can be done only between the same operating systems (e.g. iOS to iOS).
-
Choose whether this phone will send or receive the Approver data:
- Transfer configuration to a different phone,
- Receive configuration on this phone.
-
Select the how the data will be moved:
- Nearby Devices: Transfer using Bluetooth or Wi-Fi. Both devices need to be paired with Bluetooth or connected to the same Wi-Fi network.
- Animated QR Code: Scan a sequence of QR codes shown on the transfer phone with the receiving phone's camera.
-
Proceed with either the Nearby Transfer or QR Scan, depending on the selected method:
- Nearby Transfer: Your device will become visible via Bluetooth and Wi-Fi and the device search will begin. Specify the transfer PIN (visible on the transfer phone) on the receiving phone. Wait for the migration to finish successfully.
- QR Scan: Enter the transfer PIN (visible on the transfer phone) on the receiving phone and proceed with scanning the QR code sequence shown on the transfer phone. The order is not relevant as the app will order it.
You can click Cancel to abort and exit the migration screen.
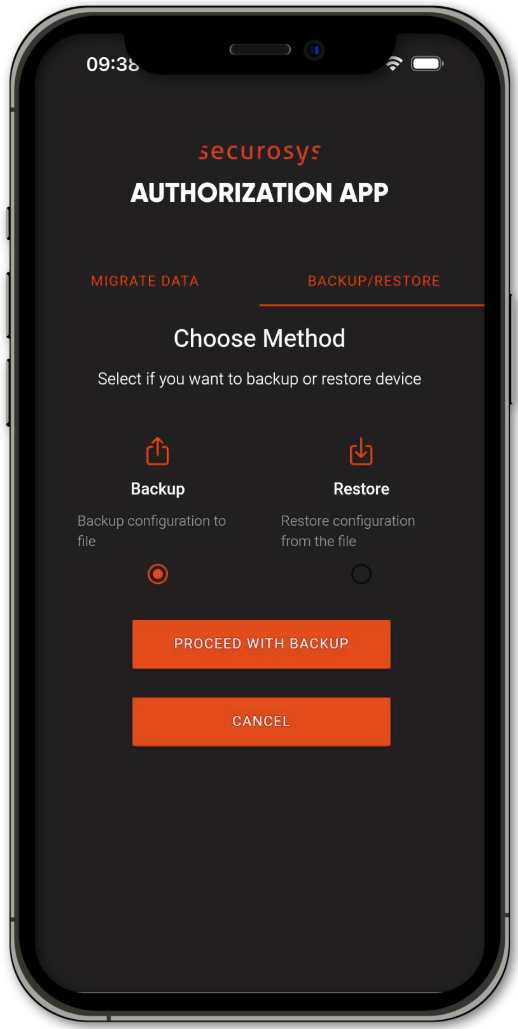
Backup / Restore
The Securosys Authorization App allows for backup and restore procedures. The backup can be saved to the phone's local storage and can be used to restore on the same or another device. The backup is protected by an AES symmetric key and a Transfer PIN.
Creating a backup:
- Select the Backup option.
- Click Proceed with Backup.
- Securely note down the Transfer PIN.
- Click Create Backup File.
The backup file has now been created and stored on your phone. Optionally, transfer the backup file off your device to an external location or to a new phone.
Restoring a backup:
- Select the Restore option.
- Click Proceed with Restore.
- Enter the Transfer PIN.
- Click Select and navigate your file manager app to select the backup file that you want to restore.
- Click Restore Configuration.
The backup has now been restored. Optionally, verify that the data in the settings page is as you expect it.
A restore overwrites the current app data with the contents of the selected backup. Any existing Approver is lost.