Installation
This guide shows how to integrate a Keycloak instance with a Securosys Primus HSM through the Keycloak Securosys HSM Provider.
Prerequisites
Before you start, you need to have the following:
- A Securosys Primus HSM or CloudHSM Partition.
- A server with Keycloak deployed.
Step 1: Obtain the Provider
You need to obtain the Provider. Currently, you need to build it yourself from source.
First, clone the Keycloak Securosys HSM Provider git repository.
Next, you need to configure Gradle with the credentials for the Securosys Maven repository.
For that, put the following content in ~/.gradle/gradle.properties
(on Windows: C:\Users\<USERNAME>\.gradle\gradle.properties).
The credentials are available on the Securosys Support Portal.
com.securosys.artifactory_user=support.reader.jce
com.securosys.artifactory_password=<redacted>
Then build the .jar file:
./gradlew clean shadowJar -x test
This will download the necessary dependencies, build the .jar file, and place it in the ./build/libs/ directory.
Step 2: Install the Provider
Take the keycloak-securosys-hsm-provider-main-1.0.0-all.jar and copy it to your Keycloak installation at /opt/keycloak/providers/.
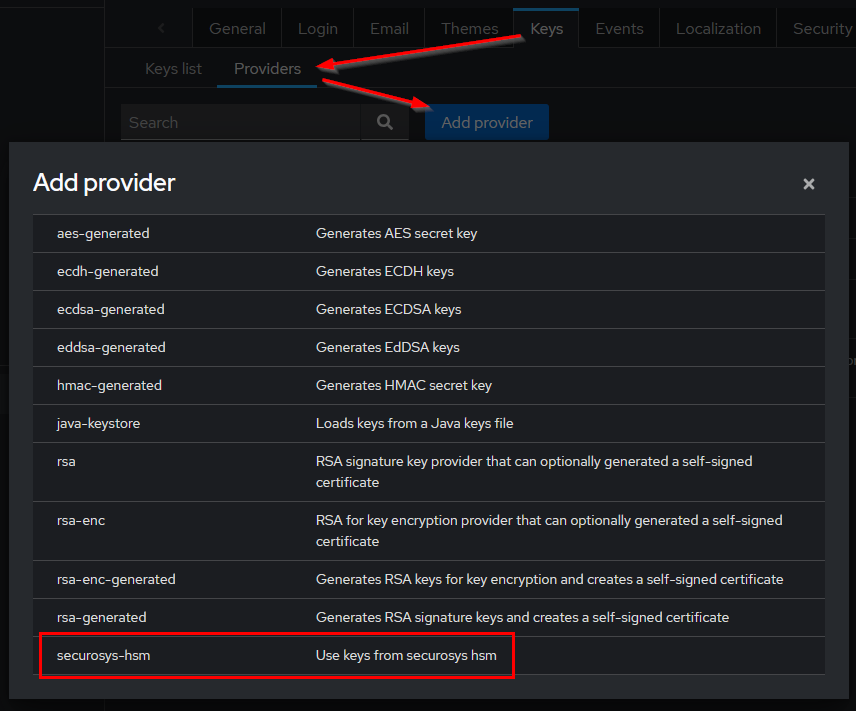
Restart your instance and navigate to Realm Settings > Keys > Providers > Add provider.
Select the automatically discovered securosys-hsm provider.
Step 3: Configure the Provider
Now that the provider is loaded into Keycloak you can access it and define your Partition details.
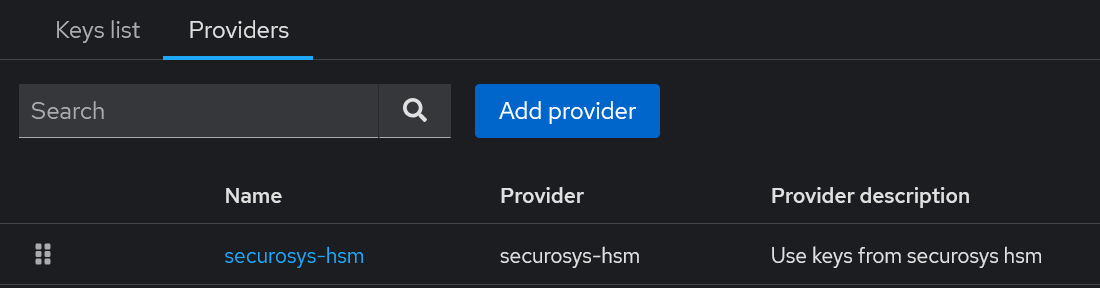
Go to the providers list and select securosys-hsm.
Here, you can define your HSM connection details. The options are explained in the table below.
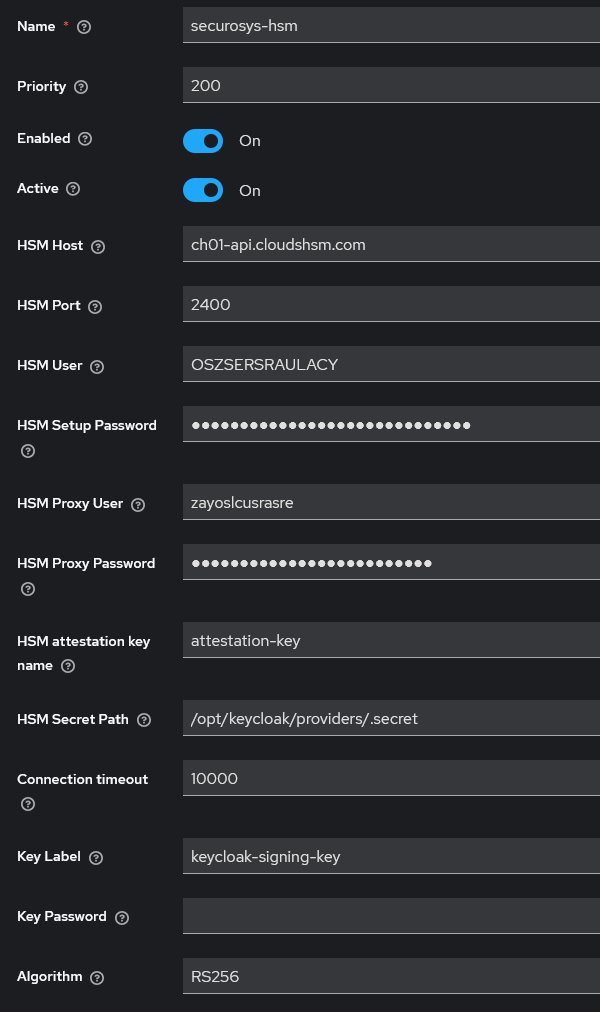
| Field | Example | Description |
|---|---|---|
| Name | securosys-hsm-rs256 | Name of the configuration for the provider |
| Priority | 200 | Key priority for signing. Higher value = higher priority |
| Enabled | true | Enable or disable the provider |
| Active | true | Enable or disable signing using this provider |
| HSM Host | ch01-api.cloudshsm.com / 192.168.1.100 | HSM URL or IP address |
| HSM JCE Port | 2400 | HSM JCE port |
| HSM User | KEYCLOAK | HSM user name (Partition name) |
| HSM Setup Password | HSM Setup Password. Used only once to fetch the User Secret, which is used from then on. | |
| HSM Secret Path | /opt/keycloak/providers/.secret | Path to store the User Secret at. |
| HSM Proxy Credentials | Proxy username and password. Only needed when using CloudHSM. | |
| HSM Attestation Key | attestation-key | Name of the attestation key on the HSM Partition. |
| Connection Timeout | 10000 | Timeout for HSM connection in milliseconds. Default: 10000 (10 s) |
| Key Label | keycloak-signing-key | Label of the key on the HSM to be used by Keycloak |
| Key Password | Password for the key. Leave empty if the key has no password | |
| Algorithm | RS256 | Signing algorithm for the key. Use RS256 for RSA keys and ES256 for EC keys. |
Step 4: Create the Signing Key
Currently, the provider does not automatically create the signing key that you specified in the Key Label field. Therefore, you need to create this key out-of-band.
For example, you can use the REST API to create the key:
curl "https://sbx-rest-api.cloudshsm.com/v1/key" \
    --header "Authorization: Bearer ${JWT_TOKEN}" \
    --json '{
    "label": "keycloak-signing-key",
    "algorithm": "RSA",
    "keySize": 2048,
    "attributes": {
        "sign": true,
        "extractable": false,
        "modifiable": true,
        "destroyable": true,
        "sensitive": true,
        "decrypt": false,
        "unwrap": false
    }
}'
Alternatively, you can use pkcs11-tool,
the Primus Tools,
or any other tool that can connect to the HSM Partition.
For JWT signing, Keycloak supports both RSA and ECDSA. However, for SAML assertion signing, Keycloak supports only RSA. Since the provider only supports configuring a single signing key, we recommend that you choose RSA.
Additionally, the key that you are generating should match the Algorithm config field specified above.
Step 5: Export the Public Key
The provider automatically collects the public key of the signing key.
Navigate to Realm Settings > Keys > Keys List and select Public Key for your signing key.

Save the output to a file called keycloak-signing-key.pub.pem.
You will need this key to validate the JWT and SAML Assertion later on.
Step 6: Test the Integration
Keycloak should now be able to sign JWTs and SAML assertions using the key from Primus HSM. This section shows how to verify that the setup is working.
Fetching a signed JWT
A tool like https://www.jwt.io/ can be used to verify that the JWT is valid.
Make a curl request to the /token endpoint, providing Client and User credentials:
curl -s https://keycloak.example.com/realms/master/protocol/openid-connect/token \
  -d "client_id=CLIENT-ID" \
  -d "client_secret=CLIENT-SECRET" \
  -d "username=USERNAME" \
  -d "password=PASSWORD" \
  -d "grant_type=password" | grep -o '"access_token":"[^"]*' | cut -d'"' -f4
The full output is the JWT of the specified user for that client.
# Header

{
  "alg": "RS256",
  "typ": "JWT",
  "kid": "securosys-hsm_29488fba-ea49-4316-b1dc-9f01a8e02ab1"
}
Optionally, you can paste the public key you collected above into the "JWT Signature Verification" field. This allows jwt.io to validate the signature.
If your Keycloak instance is publicly reachable, jwt.io automatically fetches
the public key (based on the URL in the iss field):
# Public key

{
  "e": "AQAB",
  "kty": "RSA",
  "n": "susFfYoNyeJwsUmrb40RqULGesNhYjTULumI3Gi..."
}
Additionally, you can trace the work done in the Keycloak log:
INFO  [com.securosys.hsm.service.HsmService] (executor-thread-85) Setup configuration latency for each SETTINGS: ch01-api.cloudshsm.com 2400 KEYCLOAK ms
INFO  [com.securosys.hsm.service.HsmService] (executor-thread-85) Successfully login to primus hsm
Fetching a SAML Assertion
To verify that the SAML assertion is signed by a key in Primus HSM, you need to capture the SAMLResponse
from any Relying Party (RP) that is already integrated with your realm.
This can be captured by the RP debug logs, a SAML tracer browser extension or other SSO inspection tools.
A tool like xmlsec1 can be used to verify that the captured response.xml is valid.
The command requires that you provide the signing key's public key as a --pubkey-pem.
This
xmlsec1 --verify \
  --pubkey-pem keycloak-signing-key.pub.pem \
  --id-attr:ID "urn:oasis:names:tc:SAML:2.0:protocol:Response" \
  --id-attr:ID "urn:oasis:names:tc:SAML:2.0:assertion:Assertion" \
  response.xml
A response of OK -- SignedInfo References (ok/all): 1/1 confirms that the SAML is verified
and signed by the corresponding HSM private key.
The --id-attr for Response may fail if there are multiple keys in the response.
By design SAML includes all available keys but the xmlsec1 verification will check only against the first available.
This can lead to a false-negative result.
To avoid this, you can manually collect the Reference URI from the Response, for example
<dsig:Reference URI="#ID_4801ed8d-9d6e-4db5-85d6-09c3ae17fe22"> that you then pass to the verification as
--node-id "ID_4801ed8d-9d6e-4db5-85d6-09c3ae17fe22". This will instruct xmlsec1 to verify the correct Response.
Alternatively, an online tool like https://www.samltool.io/ can be used, but it may also fall into the same issue, if the response contains multiple keys.
Conclusion
You should now have a working integration of Keycloak with Primus HSM. Now you can continue as with any plain Keycloak setup. For example, distribute the public key to the Relying Parties that need to verify JWTs or SAML assertions issued by your Keycloak instance.