Install the KMIP Server with Helm chart
This page is only relevant if you want to deploy the KMIP Server on Kubernetes. If you use the KMIP Server from Securosys CloudHSM, you can skip this page.
In this tutorial, you will learn how to set up a KMIP Server using the KMIP container, Helm, and Kubernetes.
You will configure the KMIP container and gain an understanding of the Helm values.yaml file.
The tutorial concludes with steps to verify the deployment by accessing the HSM keystore through the a KMIP Client.
By the end, you will have a functional KMIP Server backed by the HSM keystore.
The tutorial covers these steps:
- Set up the environment
- Configure the Helm chart
- Set up a two-tier KMIP Server in Kubernetes
- Access the HSM keystore
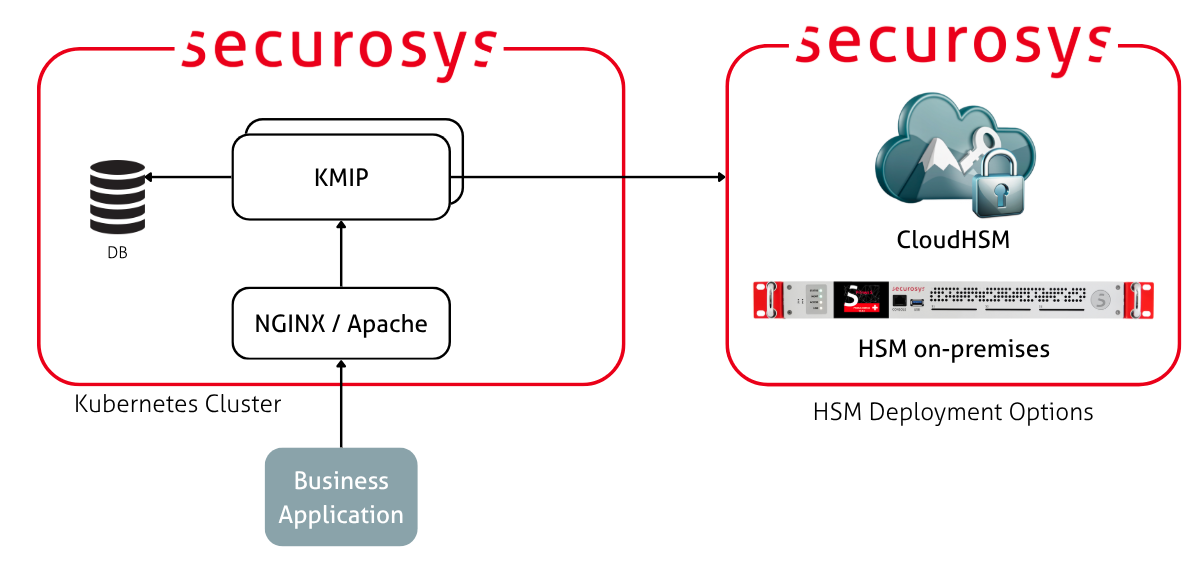
Target Architecture
The diagram below shows an example deployment architecture. It has two redundant KMIP Server instances, connected to a database cluster (PostgreSQL HA) and an HSM cluster. The KMIP instances are load balanced by a Kubernetes service and are proxied through an nginx or Apache sidecar container.
Step 1: Prepare the Environment
Create a Fresh Namespace
In your terminal, run the following command to create a namespace:
kubectl create namespace kmip-deployment
Create an Image Pull Secret
The Securosys Docker registry is protected with a login. Go to the Downloads page and obtain the login credentials.
Then create an image pull secret to allow your Kubernetes cluster to pull images from the registry:
kubectl create secret docker-registry securosys-registry \
  --docker-server=securosys.jfrog.io \
  --docker-username=robot.reader \
  --docker-password='<credentials>' \
  --namespace kmip-deployment
You now have a fresh environment ready for deploying the Key Manager using a Helm chart. Repeat this for any other deployment environment (such as production).
Proceed to the next steps to configure the KMIP Server with a database and a Securosys HSM.
Step 2: Set up the Database
The KMIP Server needs a database server. The KMIP Server uses the database to cache metadata and other non-sensitive material, such as key labels and attributes. Secret material does not (and cannot) leave the HSM.
The contents of the database will be persisted using Kubernetes volumes. This allows you to shut down your local MicroK8s cluster without losing data, so the tutorial does not need to be completed in a single session.
Currently, MariaDB and PostgreSQL are supported. This example uses PostgreSQL as it is a single-master database and is heavily used with KMIP in production environments.
You need to do the following:
- Prepare the database credentials as Kubernetes secrets for both the database and the KMIP Server.
- Configure the
values.yamlfile to deploy the database with Helm chart. - Deploy and wait for the database to be up and running.
Set the Database Credentials
Set up the database credentials for the KMIP Server and the database itself.
For PostgreSQL:
kubectl create secret generic postgresql-db-pass -n kmip-deployment \
    --from-literal=postgres-password=replace-me_db-root-password \
    --from-literal=password=replace-me_db-password
For KMIP Server:
kubectl create secret generic kmip-db-credentials -n kmip-deployment \
    --from-literal=DB_URL="jdbc:postgresql://kmip-database-postgresql.kmip-deployment.svc.cluster.local:5432/kmip" \
    --from-literal=DB_USERNAME="kmip" \
    --from-literal=DB_PASSWORD="replace-me_db-password"
If you have a local database setup, change the URI to:
--from-literal=spring.datasource.url='jdbc:postgresql://host.minikube.internal:5432/kmip' \
Deploy the Database
This example uses the Securosys Helm chart to deploy the PostgreSQL database. This Helm chart is for demonstration purposes only, in production you should use a proper setup!
The Helm chart is protected with a login. Go to the Downloads page and obtain the login credentials. Then log in to the Helm registry:
helm registry login securosys.jfrog.io --username robot.reader
To check the default values.yaml for the latest version of the Helm chart:
helm show values oci://securosys.jfrog.io/charts/psql > psql-default-values.yaml
Example of psql-default-values.yaml for the initial deployment:
psql-default-values.yaml
image:
  repository: postgres
  tag: "17-alpine"
  pullPolicy: IfNotPresent

postgres:
  dbName: kmip
  user: kmip
  existingSecret: postgresql-db-pass
  userPasswordKey: password

persistence:
  enabled: true
  size: 1Gi
  storageClassName: "standard-rwo"

resources:
  requests:
    cpu: '1000m'
    memory: '1Gi'
  limits:
    cpu: '1000m'
    memory: '1Gi'
Allocated the resources according to the size of your desired environment. For this simple tutorial, smaller values suffice.
Deploy the database:
helm install kmip-database -n kmip-deployment -f psql-default-values.yaml \
    oci://securosys.jfrog.io/charts/psql
Once the deployment is complete and the pods are ready, proceed to configure the KMIP Server.
Step 2: Set up the KMIP Server
The following sections cover how to configure the Helm chart for the KMIP Server using values.yaml
and deploy it using the Helm chart configuration.
For the initial deployment, configure the following components:
- Connect KMIP to:
- The deployed database.
- The Primus HSM cluster.
- Additionally, you may:
- Impose resource reservations and limits via the Helm chart.
- Configure auto-scaling through the
values.yamlfile.
Set the KMIP Server Credentials
In a production environment, you need the CA certificate that signed your KMIP client certificates. This is typically provided by your PKI team.
The following credentials have to be set, we strongly recommend to create the keystore and truststore files using the Key Manager UI.
kmip-db-credentials(database credentials)kmip-tls-keystore(the PKCS12 keystore used for TLS and HTTPS)kmip-tls-truststore(the JKS truststore used for mTLS)kmip-keystore-passwords(the keystore & truststore passwords)kmip-ca-keystore(Optional, CA for signing cert requests with KMIP Certify operation)kmip-validate-keystore(Optional, trusted certs for KMIP Validate operation)
As a reference, here are the commands to create the secrets listed:
Kubernetes Secrets References
kmip-db-credentials:
kubectl create secret generic kmip-db-credentials \
    --from-literal=DB_URL="kmip-database-postgresql.kmip-deployment.svc.cluster.local" \
    --from-literal=DB_USERNAME="kmip" \
    --from-literal=DB_PASSWORD="replace-me_db-password" \
    -n kmip-deployment \
    --dry-run=client -o yaml | kubectl apply -f -
kmip-hsm-sensitive:
kubectl create secret generic kmip-hsm-sensitive \
    --from-literal=PRIMUS_HOST="ch01-api.cloudshsm.com,ch02-api.cloudshsm.com" \
    --from-literal=PRIMUS_PORT="2300" \
    --from-literal=PRIMUS_USER="<PARTITION-NAME>" \
    --from-literal=PRIMUS_PASSWORD="<SETUP-PASSWORD>" \
    -n kmip-deployment \
    --dry-run=client -o yaml | kubectl apply -f -
kmip-keystore-passwords:
kubectl create secret generic kmip-keystore-passwords \
    --from-literal=TLS_KEYSTORE_PASSWORD="<your-keystore-password>" \
    --from-literal=TLS_TRUSTSTORE_PASSWORD="<your-truststore-password>" \
    --from-literal=CA_KEYSTORE_PASSWORD="<your-ca-keystore-password>" \
    --from-literal=VALIDATE_TRUSTSTORE_PASSWORD="<your-validate-truststore-password>" \
    -n kmip-deployment \
    --dry-run=client -o yaml | kubectl apply -f -
kmip-tls-keystore:
kubectl create secret generic kmip-tls-keystore \
    --from-file=keystore.p12="<your-path-to-the-server-keystore>" \
    -n kmip-deployment \
    --dry-run=client -o yaml | kubectl apply -f -
kmip-tls-truststore:
kubectl create secret generic kmip-tls-truststore \
    --from-file=truststore.jks="<your-path-to-the-server-truststore>" \
    -n kmip-deployment \
    --dry-run=client -o yaml | kubectl apply -f -
kmip-ca-keystore:
kubectl create secret generic kmip-ca-keystore \
    --from-file=ca-keystore.p12="<your-path-to-the-ca-keystore>" \
    -n kmip-deployment \
    --dry-run=client -o yaml | kubectl apply -f -
kmip-validate-keystore:
kubectl create secret generic kmip-validate-keystore \
    --from-file=validate-keystore.jks="<your-path-to-the-validation-keystore>" \
    -n kmip-deployment \
    --dry-run=client -o yaml | kubectl apply -f -
Configure the KMIP Server using values.yaml
Helm chart deployments are customized using the values.yaml.
The Helm chart is protected with a login. Go to the Downloads page and obtain the login credentials. Then log in to the Helm registry:
helm registry login securosys.jfrog.io --username robot.reader
To check the default values.yaml for the latest version of the Helm chart:
helm show values oci://securosys.jfrog.io/charts/kmip > kmip-default-values.yaml
Example kmip-default-values.yaml for the initial deployment:
kmip-default-values.yaml
##############################################################################################
# Image Configuration
##############################################################################################
imagePullSecrets:
  - name: securosys-registry

replicaCount: 2

image:
  repository: securosys.jfrog.io/kmip/securosys-kmip
  pullPolicy: IfNotPresent
  tag: "2.4.1"

##############################################################################################
# Service Account
##############################################################################################
serviceAccount:
  create: true
  annotations: {}
  name: ""

##############################################################################################
# KMIP Server Application Configuration
##############################################################################################
kmip:
  # Environment variables from secrets
  envFrom:
    - secretRef:
        name: kmip-db-credentials
    - secretRef:
        name: kmip-hsm-sensitive
    - secretRef:
        name: kmip-keystore-passwords

  # Additional environment variables (optional)
  env: {}
  #   JAVA_OPTS: "-Xmx1024m"

  # HSM Configuration
  hsm:
    defaultAttributes:
      extractable: true
      sensitive: false
    log:
      debug: true
      verbose: true
      info: true

  # Database Configuration
  db:
    type: postgresql
    version: 19

  # Server Configuration
  server:
    tlsPort: 5696
    httpsPort: 5697
    maxThreads: 254
    credentialTypes: Certificate

    # Cryptographic objects may not have a ProtectionPeriod that exceeds this date
    # Format: yyyy-mm-dd
    # To allow ANY ProtectionPeriod, comment out this setting
    protectionPeriodExpirationDate: "2030-01-01"

    # KMIP Login configuration for the Authentication Token
    token:
      slotSize: 32
      checkExpiry: true
      expireTime: 3600
      expiresInactive: false
      expiresInactiveTime: 300

  # TLS Configuration
  tls:
    # Name of secret containing keystore.p12
    keyStoreSecretName: kmip-tls-keystore
    keystoreType: PKCS12
    # Name of secret containing truststore.jks for mTLS
    trustStoreSecretName: kmip-tls-truststore
    truststoreType: JKS
    # TLS Protocols
    enabledProtocols: "TLSv1.3,TLSv1.2"

  # Certificate Authority Configuration
  ca:
    # Enable CA for signing cert requests with KMIP Certify operation
    active: false
    keyStoreSecretName: kmip-ca-keystore
    keystoreType: PKCS12
    keyStoreAlias: CA
    validityDays: 365

    # Validation Configuration
    # Trusted certs for KMIP Validate operation
    "validate.active": false
    "validate.keyStoreSecretName": kmip-validate-keystore
    truststoreType: JKS

##############################################################################################
# Resource Configuration
##############################################################################################
resources:
  limits:
    memory: "2Gi"
    cpu: "2"
  requests:
    memory: "2Gi"
    cpu: "2"

##############################################################################################
# Autoscaling Configuration (optional)
##############################################################################################
autoscaling:
  enabled: false
  minReplicas: 2
  maxReplicas: 5
  targetCPUUtilizationPercentage: 70
  targetMemoryUtilizationPercentage: 80

##############################################################################################
# Pod Disruption Budget (optional)
##############################################################################################
podDisruptionBudget:
  enabled: false
  minAvailable: 1
  # maxUnavailable: 1

##############################################################################################
# Log Volume - Persistent (optional)
##############################################################################################
persistence:
  enabled: false
  size: 5Gi
  storageClassName: ""  # Use default storage class if not specified
  # accessMode: ReadWriteOnce

##############################################################################################
# Service Configuration
##############################################################################################
service:
  type: NodePort
  # ClusterIP for internal-only access
  # LoadBalancer for external access
  # NodePort for specific port mapping

  # Annotations for LoadBalancer (e.g., for cloud providers)
  annotations: {}
  #   service.beta.kubernetes.io/aws-load-balancer-type: "nlb"
  #   service.beta.kubernetes.io/azure-load-balancer-internal: "true"

  # KMIP TLS port (primary)
  tlsPort: 5696
  tlsNodePort: "30445"  # Optional: specify NodePort if type is NodePort

  # KMIP HTTPS port (secondary)
  httpsPort: 5697
  httpsNodePort: ""  # Optional: specify NodePort if type is NodePort

  # LoadBalancer IP (optional, cloud-specific)
  loadBalancerIP: ""
  loadBalancerSourceRanges: []
  #   - 10.0.0.0/8

##############################################################################################
# Ingress Configuration (optional)
##############################################################################################
ingress:
  enabled: false
  className: ""
  annotations: {}
  #   cert-manager.io/cluster-issuer: letsencrypt-prod
  hosts:
    - host: kmip.example.com
      paths:
        - path: /
          pathType: Prefix
  tls: []
  #   - secretName: kmip-tls
  #     hosts:
  #       - kmip.example.com

##############################################################################################
# Pod Security Context
##############################################################################################
podSecurityContext:
  runAsNonRoot: true
  runAsUser: 1000
  fsGroup: 1000
  seccompProfile:
    type: RuntimeDefault

##############################################################################################
# Container Security Context
##############################################################################################
securityContext:
  allowPrivilegeEscalation: false
  capabilities:
    drop:
      - ALL
  readOnlyRootFilesystem: false

##############################################################################################
# Node Selection
##############################################################################################
nodeSelector: {}

tolerations: []

affinity: {}
#   podAntiAffinity:
#     preferredDuringSchedulingIgnoredDuringExecution:
#       - weight: 100
#         podAffinityTerm:
#           labelSelector:
#             matchExpressions:
#               - key: app.kubernetes.io/name
#                 operator: In
#                 values:
#                   - kmip
#           topologyKey: kubernetes.io/hostname
Step 3: Deploy KMIP Server
Deploy the KMIP Server:
# Dry run to see what will be deployed
helm install kmip-server -n kmip-deployment -f kmip-default-values.yaml \
  oci://securosys.jfrog.io/charts/kmip --dry-run --debug

# Actually deploy
helm upgrade --install kmip-server -n kmip-deployment -f kmip-default-values.yaml \
  oci://securosys.jfrog.io/charts/kmip
Check the logs:
# Get running pods
kubectl get pods -n kmip-deployment -w

# inspect logs
kubectl logs -n kmip-deployment kmip-server-7fdffc559b-bwfvd -f
To monitor the deployment and cluster, run the following:
kubectl get all,pvc,cm,secret -n kmip-deployment
The output will be similar to the following:
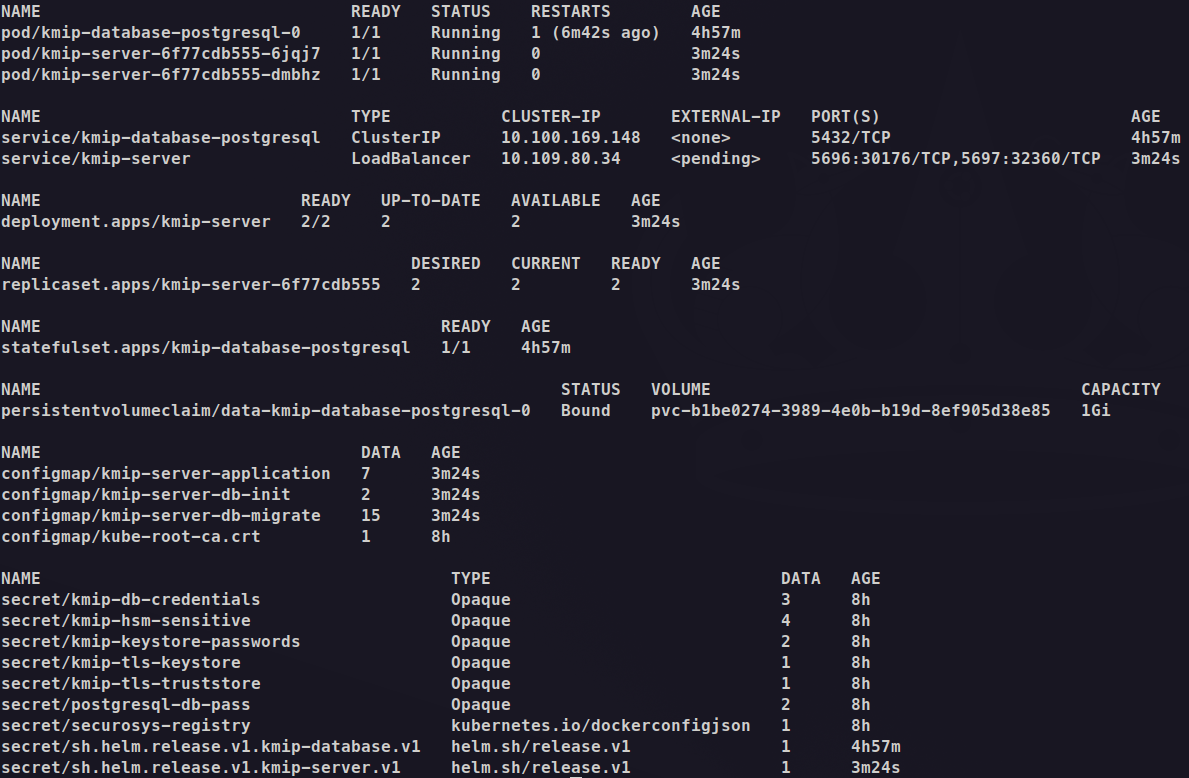
Note the following expected behavior:
-
A Deployment named
kmip-serveris created: The deployment manages 2 replicas. The pods are in the READY state (2/2). -
The pods are running:
pod/kmip-server-6f77cdb555-6jqj7contains the KMIP Server application container and is in READY state (1/1)pod/kmip-server-6f77cdb555-dmbhzcontains the KMIP Server application container and is in READY state (1/1)
-
There is one service for the KMIP Server:
kmip-server: ClusterIP service at10.109.80.34:5696for internal communication
-
Access recommendations:
-
For local testing with minikube tunnel,
- you need to run
minikube tunnelin a separate terminal to assign anEXTERNAL-IPto the kmip-server service.
- you need to run
-
For local testing without minikube tunnel,
-
for direct access, use:
kubectl port-forward svc/kmip-server 5696:5696 -n kmip-deploymentTest the connection:
openssl s_client \-connect 127.0.0.1:5696 \-cert client-ca-cert.pem \-key client-ca-key.pem \-CAfile server.crtIf handshake succeeds and you can type any text, your mTLS pair works: Verify return code: 0 (ok)
-
-
Troubleshooting
To reset the deployment:
helm uninstall kmip-server -n kmip-deployment

kubectl delete secret -n kmip-deployment kmip-db-credentials
kubectl delete secret -n kmip-deployment kmip-hsm-sensitive
kubectl delete secret -n kmip-deployment kmip-keystore-passwords
kubectl delete secret -n kmip-deployment kmip-tls-keystore
kubectl delete secret -n kmip-deployment kmip-tls-truststore
kubectl delete secret -n kmip-deployment kmip-ca-keystore
kubectl delete secret -n kmip-deployment kmip-validate-keystore
Reinstall:
helm upgrade --install kmip-server -n kmip-deployment -f kmip-default-values.yaml \
  oci://securosys.jfrog.io/charts/kmip
For graphical debugging:
minikube dashboard