Install the Key Manager with Helm chart
This page is only relevant if you want to deploy the Key Manager on Kubernetes, typically if you already have the Securosys REST API on Kubernetes.
In this tutorial, you will learn how to set up a near-production Key Manager UI using the KMS container, Helm, and Kubernetes.
You will configure the Key Manager container and gain an understanding of the Helm values.yaml file.
The tutorial concludes with steps to verify the deployment by accessing the HSM keystore through the REST API.
By the end, you will have a functional Key Manager User Interface.
The tutorial covers these steps:
- Set up the environment
- Configure the Helm chart
- Set up a one-tier Key Manager in Kubernetes
- Access the HSM keystore
Target Architecture
The diagram below shows an example deployment architecture. It has two TSB instances, connected to a database cluster (such as PostgreSQL HA) and an HSM cluster. The TSB instances are load balanced, a human user connects through the Key Manager UI to the HSM, the UI is accessible by a Kubernetes service and proxies through an nginx or Apache sidecar container.

Prerequisites
Before you begin, you need:
- A Kubernetes cluster.
- A TSB deployed either in the Kubernetes cluster, another Docker host or from CloudHSM.
If you have no TSB, please follow the TSB Installation guide first.
For local testing, the simplest option is to use MicroK8s as a Kubernetes cluster.
Step 1: Prepare the Environment
Create a Fresh Namespace
In your terminal, run the following command to create a namespace:
kubectl create namespace kms-deployment
Create an Image Pull Secret
The Securosys Docker registry is protected with a login. Go to the Downloads page and obtain the login credentials.
Then create an image pull secret to allow your Kubernetes cluster to pull images from the registry:
kubectl create secret docker-registry securosys-registry \
--docker-server=securosys.jfrog.io \
--docker-username=robot.reader \
--docker-password='<credentials>' \
--namespace kms-deployment
You now have a fresh environment ready for deploying the Key Manager using a Helm chart. Repeat this for any other deployment environment (such as production). Proceed to the next steps to configure Key Manager.
Step 2: Set up the Key Manager UI
The following sections cover how to configure the Helm chart using values.yaml
and deploy the Key Manager UI using the Helm chart configuration.
For the initial deployment, configure the following components:
- Connect the Key Manager to the TSB (REST API).
- Use nginx as a sidecar to act as a proxy for the Key Manager:
- Enable LoadBalancer service to allow access to the UI from outside the Kubernetes cluster.
- Additionally, you may:
- Impose resource reservations and limits via the Helm chart.
- Configure auto-scaling through the
values.yamlfile.
Set the TSB Credentials
Set up the TSB credentials that allow the Key Manager to access a Partition on the HSM via the REST API. These values should be provided by your TSB or HSM administrator.
kubectl create secret generic kms-hsm-credentials \
  -n kms-deployment \
  --from-literal=TSB_REST_API_TOKEN='ey...'
Configure Key Manager using values.yaml
Helm chart deployments are customized using the values.yaml.
The Securosys Helm Registry is protected with a login.
Go to the Downloads page and obtain the login credentials.
Then log into the Helm registry:
helm registry login securosys.jfrog.io --username robot.reader
To check the default values.yaml for the latest version of the Helm chart:
helm show values oci://securosys.jfrog.io/charts/kms > kms-default-values.yaml
Example values.yaml for the initial deployment:
values
imagePullSecrets: [{ name: securosys-registry }]
replicaCount: 1

image:
  repository: securosys.jfrog.io/kms/securosys-kms
  pullPolicy: IfNotPresent
  tag: "0.2.0"

##############################################################################################
# KMS Application Configuration
##############################################################################################
kms:

  envFrom:
    #- secretRef:
        #name: kms-tls-sensitive
    #- secretRef:
        #name: kms-hsm-credentials
    #- secretRef:
        #name: kms-oauth-sensitive
    #- secretRef:
        #name: kms-tsb-mtls-sensitive

  tls:
    enabled: false

  # HSM / TSB Configuration
  tsb:
    rest_api_url: "http://tsb-server.default.svc.cluster.local:8080"
    verify_server_certificate: false # Verify TSB Server Certificate (recommended)
    server_certificate_path: "/app/mtls/server.crt" # Server Certificate filepath (HTTPS), REMOVE if server certificate is signed by a public ca!
    mtls:
      enabled: false

  authentication:
      enabled: false
      # Supported values:
        #   "oauth"      - Microsoft Entra / Azure AD, GitHub OAuth, KeyCloak
        #   "hsm_auth"   - Hardware Security Module users
        #   ""           - User Authentication disabled
      provider: ''

  two_factor:
    enabled: true                                   # Set to true to enable 2FA globally (authentication.provider must not be empty)
    required: false                                 # Set to true to make 2FA mandatory for all users

  # Multi-Tenancy (optional)
  # Allows users to work with multiple HSM partitions / TSB instances.
  # vault_type: "hsm" | "azure_key_vault" | "gcp_secret_manager"
  multi_tenancy:
    enabled: false
    vault_type: "hsm"                               # "hsm", "azure_key_vault", or "gcp_secret_manager"
    # Azure Key Vault settings (when vault_type = "azure_key_vault")
    # vault_url: "https://my-vault.vault.azure.net/"
    # tenant_id: ""
    # client_id: ""
    # client_secret: ""
    # GCP Secret Manager settings (when vault_type = "gcp_secret_manager")
    # project_id: ""
    # credentials_file: ""
    # secret_prefix: ""

  # AI / MCP Integration (optional)
  # Enables the "Chat" tab with an AI assistant connected to the HSM via MCP.
  mcp:
    enabled: false
    url: ""                                         # MCP server endpoint URL — if empty, Chat tab is not shown
    # Configure one or more AI providers as sub-entries.
    # Each provider needs: provider, model, api_key (label and base_url are optional).
    # Supported provider types: "anthropic", "openai", "gemini", "local"
    providers:
      claude:
        provider: "anthropic"
        label: "Claude Opus"
        model: "claude-opus-4-20250514"
        api_key: ""                                 # Anthropic API key
      # gpt:
      #   provider: "openai"
      #   label: "GPT-4o"
      #   model: "gpt-4o"
      #   api_key: ""
      # gemini:
      #   provider: "gemini"
      #   label: "Gemini 2.5 Pro"
      #   model: "gemini-2.5-pro"
      #   api_key: ""
      # ollama:
      #   provider: "local"
      #   label: "Ollama (local)"
      #   model: "deepseek-r1:8b"
      #   api_key: ""
      #   base_url: "http://localhost:11434/v1"

  # Audit Logging (optional)
  audit:
    enabled: false
    log_dir: "logs"                                 # Directory for audit JSONL logs

  # Demo Mode (optional) — restrict LLM chat usage
  demo:
    enabled: false
    max_llm_messages: 3                             # Max messages per user per time window
    time_window_minutes: 60                         # Rolling window in minutes

##############################################################################################
# Resource Configuration
##############################################################################################
resources:
  limits:
    memory: "1Gi"
    cpu: "1000m"
  requests:
    memory: "1Gi"
    cpu: "1000m"

# autoscaling:
#   enabled: true
#   minReplicas: 2
#   maxReplicas: 5
#   targetCPUUtilizationPercentage: 70
#   targetMemoryUtilizationPercentage: 80

##############################################################################################
# Service Configuration
##############################################################################################
service:
  type: NodePort  # ClusterIP, LoadBalancer
  port: 8501
  nodePort: 30443
Step 3: Deploy Key Manager UI
Deploy the UI:
# Dry run to see what will be deployed
helm install kms-app -n kms-deployment -f kms-default-values.yaml \
  oci://securosys.jfrog.io/charts/kms --dry-run --debug

# Actually deploy
helm upgrade --install kms-app -n kms-deployment -f kms-default-values.yaml \
  oci://securosys.jfrog.io/charts/kms
Check the logs:
# Get running pods
kubectl get pods -n kms-deployment -w

# inspect logs
kubectl logs -n kms-deployment kms-app-7fdffc559b-bwfvd -f
To monitor the deployment and cluster, run the following:
kubectl get all,pvc,cm,secret -n kms-deployment
The output will be similar to the following:
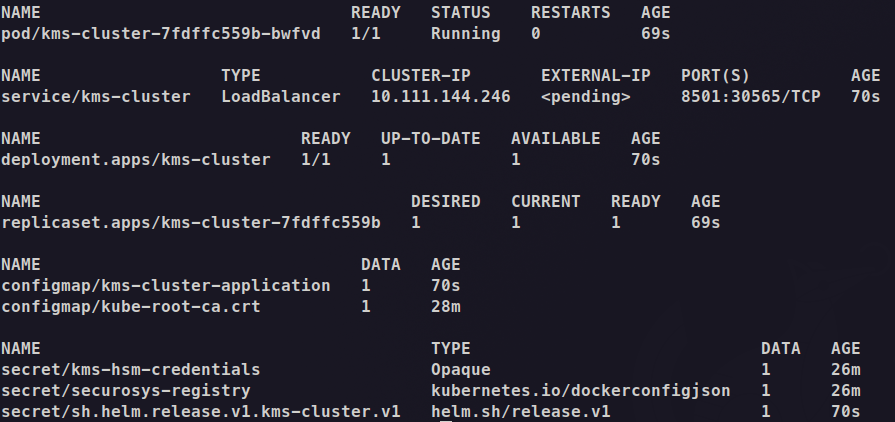
Note the following expected behavior:
- A Deployment named kms-app is created: The deployment manages 1 replicas. The pod is in the READY state (2/2).
- The pod is running:
pod/kms-app-7fdffc559b-bwfvdcontains the Key Manager UI application container and is in READY state (1/1)
- There is one services for TSB:
- kms-app: ClusterIP service at
10.111.144.246:8501for internal communication
- kms-app: ClusterIP service at
- Access recommendations:
- For local testing with minikube tunnel,
- you need to run
minikube tunnelin a separate terminal to assign anEXTERNAL-IPto the kms-app service.
- you need to run
- For local testing without minikube tunnel,
- for direct access, use:
and go to http://localhost:8501kubectl port-forward svc/kms-app 8501:8501 -n kms-deployment
- for access via load-balancer follow Configure Load Balancer & TLS
and use:
and go to https://localhost:8443kubectl port-forward svc/kms-app-nginx 8443:443 -n kms-deployment
- for direct access, use:
- For local testing with minikube tunnel,
First-Time Setup
On first launch with HSM Authentication enabled, the Key Manager UI will prompt you to create your initial administrator account.
- Enter a username, email, and password (minimum 8 characters, must include uppercase, lowercase, and digits).
- This account will be assigned the admin role automatically.
- Additional users can be created later from the Security Settings page.
This bootstrap step only appears once - on the very first launch when no users exist. If you are using OAuth authentication (Microsoft Entra ID, GitHub, Keycloak), users are managed by the identity provider and this step does not apply.