Installation
This guide explains how to integrate NetApp ONTAP with Securosys Primus HSMs via the Securosys KMIP Server.
This guide assumes that you already have an ONTAP Cluster and will not go over how to setup ONTAP itself.
Instead, it will focus on how to add the Securosys KMIP Server to the cluster as the key-manager.
Prerequisites
To follow this guide, you need the following items:
- Terminal access to the ONTAP on-premise / cloud server.
- ONTAP version v9.17.1P1 or higher.
- Securosys KMIP Server v2.4.1 with KMIP protocol v2.1.
- If you haven't already, follow the KMIP Server installation guide first.
- [Highly recommended] Securosys Key Manager UI and Transaction Security Broker (TSB).
Step 1: Obtain TLS Certificates
The connection between NetApp ONTAP and the Securosys KMIP Server is secured using mutual TLS (mTLS). Therefore, you need to obtain the following in PEM format:
- TLS server (truststore): The public server certificate of the KMIP Server.
- TLS client (keystore): The client private-key and certificate.
Server Certificate
Fetch the server's certificate (TLS server truststore) by executing the following command, or ask the kmip-server admin for the TLS-Certificate.
openssl s_client -showcerts -connect <replace-with-your-server-ip-or-url>:5696 </dev/null 2>/dev/null | sed --silent '/BEGIN CERTIFICATE/,/END CERTIFICATE/p' > kmip-server-truststore.pem
Client Certificate
For NetApp ONTAP (acting as the KMIP Client), generate a private client key and a certificate.
Note: The client certificate needs to be added to the list of allowed clients on the KMIP Server.
The easiest and recommended way to do both in one go is via the Securosys Key Manager UI. Follow this tutorial to create a KMIP User for NetApp ONTAP, and download the generated client certificate and key.
Step 2: Configure External KMS on ONTAP
-
A configured vserver admin and node are required in order to add an external key manager:
Cluster01::> vserver showAdmin Operational RootVserver Type Subtype State State Volume Aggregate----------- ------- ---------- ---------- ----------- ---------- ----------Cluster01 admin - - - - -Cluster01-01 node - - - - -2 entries were displayed. -
Install the client key + crt into the admin vserver (as seen in 'vserver show').
Cluster01::> security certificate install -vserver Cluster01 -type clientPlease enter Certificate: Press <Enter> when done<Enter public key data>Please enter Private Key: Press <Enter> when done<Enter private key data>The certificate's generated name for reference: SECUROSYS-SHA2_037B -
Likewise, Install the server CA certificate into the admin vserver (as seen in 'vserver show'). Paste in the content of the server certificate from your
serverchain.pemfile.Cluster01::> security certificate install -type server-ca -subtype kmip-cert -vserver <your_server_name>Enter certificate: Press <Enter> when done-----BEGIN CERTIFICATE-----MIIFnjCCA4agAwIBAgIUfTzi+UURzHAI8Log0Vb8Kf6DJXwwDQYJKoZIhvcNAQEL...tgebYKM3RO0MyVREDZjJ2YCycD8PNglCrSisr6MT+bUbMKdZ6Nnh8hE0StKQ/QPCIuk=-----END CERTIFICATE-----You should keep a copy of the CA-signed digital certificate for futurereference.The installed certificate's CA and serial number for reference:CA: <CN_of_your_certificate>serial: ######The certificate's generated name for reference: <CN_of_your_certificate> -
You can use the below to view installed certificates:
Cluster01::> security certificate show Client*Vserver Serial Number Certificate Name Type---------- --------------- -------------------------------------- ------------Cluster01 ###### Client1 clientCertificate Authority: Securosys SAExpiration Date: Tue Aug 22 04:43:03 2045Cluster01::> security certificate show Server*Vserver Serial Number Certificate Name Type---------- --------------- -------------------------------------- ------------Cluster01 ###### Server1 server-caCertificate Authority: Securosys SAExpiration Date: Mon Apr 02 20:20:09 2035
Either choose a long certificate lifetime, or don't forget to renew and re-install your certificates!
Step 3: Enable the External Key Manager
Specify which server to use as the external key manager for the admin vserver.
Cluster01::> security key-manager external enable -vserver Cluster01 -key-servers <IPAddress>:<Port> -client-cert Client1 -server-ca-cert Server1
| Argument | Description |
|---|---|
-vserver | Your OnTAP vServer name. |
-key-servers | Domain/IP-Address and port of the KMIP Server. Default KMIP-Port is: 5696 |
-client-cert | Name of the client certificate as shown in the "Certificate Name" above. |
-server-ca-certs | Name of the server certificate as shown in the "Certificate Name" above. |
Verify the External Key Manager Connection
Cluster01::> security key-manager external show-status

                Node: securosys-01
             Vserver: securosys
     Key Server Port: 5696
 KMIP is operational: true

Key Server                  Role           Server Status     Reason
-------------------         ------------   ---------------   ------
kmip-server.cloudshsm.com   primary        available         -
Step 4: Enable Volume Encryption
Enable encryption on one or more of your storage volumes (as seen in 'volume show') using:
Cluster01::> volume encryption conversion start -vserver Data01 -volume vol_2

Setup complete.
Verify volume encryption:
Cluster01::> volume show -volume vol_2 -fields is-encrypted,encryption-type
vserver        volume encryption-type is-encrypted
-------------- ------ --------------- ------------
svm_securosys2 vol_2  volume          true
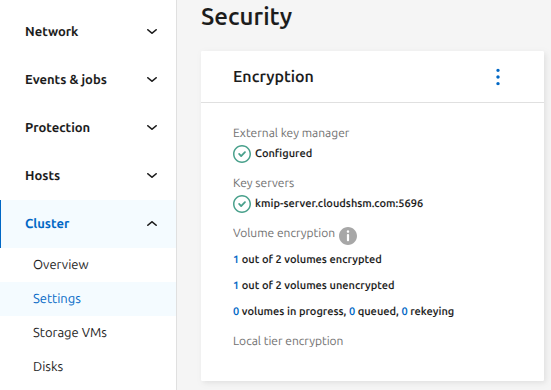
Another way to verify the external Key-Manager is through the ONTAP UI. Navigate to the Console Cluster Settings Security.
Configure a KMIP Cluster
ONTAP supports connecting to a cluster of KMIP Servers.
This is done by defining a secondary-key-servers in your vserver.
Ensure that you have already setup a primary key server in the previous section and run:
Cluster01::> security key-manager external modify-server -vserver <your_server_name> -key-servers kmip-server.cloudshsm.com -secondary-key-servers <list_of_key_servers>
list_of_key_servers accepts a comma-separated list of up to three servers, as DNS names or IP addresses.