Install the TSB with Helm chart
This page is only relevant if you want to deploy TSB on Kubernetes. If you use the TSB from the Securosys Cloud or Docker, you can skip this page.
In this tutorial, you will learn how to set up a near-production Transaction Security Broker using the TSB container, Helm, and Kubernetes.
You will configure the TSB container and gain an understanding of the Helm values.yaml file.
The tutorial concludes with steps to verify the deployment by accessing the HSM keystore through the REST API.
By the end, you will have a functional TSB environment ready for further development or integration.
The tutorial covers these steps:
- Set up the environment
- Configure the Helm chart
- Set up a two-tier TSB in Kubernetes
- Access the HSM keystore
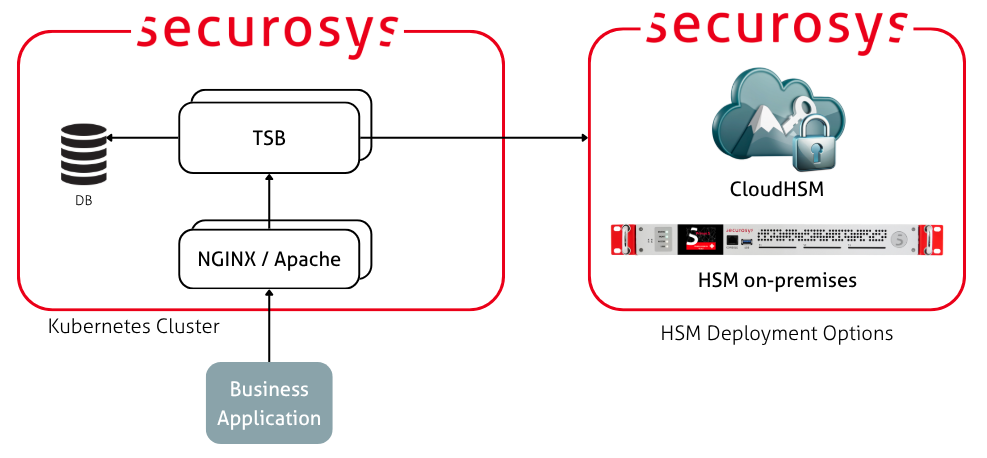
Target Architecture
The diagram below shows an example deployment architecture. It has two TSB instances, connected to a database cluster (such as PostgreSQL HA) and an HSM cluster. The TSB instances are load balanced by a Kubernetes service and proxies through an nginx or Apache sidecar container.
Prerequisites
Before you begin, you need:
- A Kubernetes cluster.
- A load balancer – to allow cluster external access.
- Volumes – to persist the contents of the database.
For local testing, the simplest option is to use MicroK8s as a Kubernetes cluster.
Step 1: Prepare the Environment
Create a Fresh Namespace
In your terminal, run the following command to create a namespace:
kubectl create namespace tsb-deployment
Create an Image Pull Secret
The Securosys Docker registry is protected with a login. Go to the Downloads page and obtain the login credentials.
Then create an image pull secret to allow your Kubernetes cluster to pull images from the registry:
kubectl create secret docker-registry securosys-registry \
--docker-server=securosys.jfrog.io \
--docker-username=robot.reader.tsb \
--docker-password='<credential>' \
--namespace tsb-deployment
You now have a fresh environment ready for deploying the TSB using a Helm chart. Repeat this for any other deployment environment (such as production).
Proceed to the next steps to configure TSB with a database and a Securosys HSM.
Step 2: Set up the Database
Install a database in Kubernetes for convenience. TSB will be connected to a supported database i.e. MariaDB, PostgreSQL or MSSQL in a production environment. In this tutorial, having a database will allow you to simulate a similar setting.
The contents of the database will be persisted using Kubernetes volumes. This allows you to shut down your local MicroK8s cluster without losing data, so the tutorial does not need to be completed in a single session.
This example uses PostgreSQL as it is a single-master database and is heavily used with TSB in production environments.
You need to do the following:
- Prepare the database credentials as Kubernetes secrets for both the database and TSB.
- Configure the
values.yamlfile to deploy the database with Helm Chart. - Deploy and wait for the database to be up and running.
Set the Database Credentials
Set up the database credentials for TSB and the database itself.
For PostgreSQL:
kubectl create secret generic postgresql-db-pass -n tsb-deployment \
    --from-literal=postgres-password=replace-me_db-root-password \
    --from-literal=password=replace-me_db-password
For TSB:
kubectl create secret generic tsb-db-credentials -n tsb-deployment \
    --from-literal=spring.datasource.url="jdbc:postgresql://tsb-database-postgresql.tsb-deployment.svc.cluster.local:5432/securosys?characterEncoding=utf8" \
    --from-literal=spring.datasource.username=tsb \
    --from-literal=spring.datasource.password=replace-me_db-password
If you have a local database setup change the URL to:
--from-literal=spring.datasource.url='jdbc:mariadb://host.minikube.internal:5432/securosys?allowPublicKeyRetrieval=true&sslMode=false' \
Deploy the Database
This example uses the Helm chart maintained by Bitnami to deploy the database.
The Helm deployment configuration is done with values-postgresql.yaml:
replicaCount: 1  # PostgreSQL primary, not 2
architecture: standalone  # or "replication" if you want primary-replica

auth:
  existingSecret: postgresql-db-pass
  username: tsb
  database: securosys

persistence:
  enabled: true
  size: 100Mi

primary:
  resources:
    requests:
      cpu: '1000m'
      memory: '1Gi'
    limits:
      cpu: '1000m'
      memory: '1Gi'
In this example, we are configuring only 100MB of storage in persistence.size as it is sufficient for this tutorial. If you are planning to use this installation for other tests, increase it to 1000Mi.
Deploy the database:
helm install tsb-database -n tsb-deployment -f values-postgresql.yaml \
    oci://registry-1.docker.io/bitnamicharts/postgresql
Once the deployment is complete and the pods are ready, proceed to configure TSB.
Step 3: Set up the TSB
This tutorial shows how to use TSB as a REST API designed to connect to the Securosys HSM.
The following sections cover how to configure the Helm chart using values.yaml
and deploy TSB using the Helm chart configuration.
For the initial deployment, configure the following components:
-
Connect TSB to:
- The deployed database.
- The HSM cluster.
-
Use nginx as a sidecar to act as a proxy for TSB:
- Enable LoadBalancer service to allow access to TSB from outside the Kubernetes cluster.
- You can also use this service for internal cluster operations.
-
Additionally, you may:
- Impose resource reservations and limits via the Helm chart.
- Configure auto-scaling through the
values.yamlfile.
Set the HSM Credentials
Set up the HSM credentials that allow the TSB to access a Partition on the HSM. These values should be provided by your HSM administrator.
kubectl create secret generic tsb-hsm-sensitive \
  -n tsb-deployment \
  --from-literal=hsm.host='ch01-api.cloudshsm.com,ch02-api.cloudshsm.com' \
  --from-literal=hsm.port='2300' \
  --from-literal=hsm.user='<partition-name>' \
  --from-literal=hsm.setupPassword='<setup-password>' \
  --from-literal=hsm.encryptionPassword='change-me-to-be-strong'
Configure TSB using values.yaml
Helm chart deployments are customized using the values.yaml.
The TSB Helm Chart is protected with a login. Go to the Downloads page and obtain the login credentials.
helm registry login securosys.jfrog.io --username robot.reader.tsb
To check the default values.yaml for the latest version of the Helm chart:
helm show values oci://securosys.jfrog.io/charts/tsb > tsb-default-values.yaml
Example values.yaml for the initial deployment:
values
imagePullSecrets: [{ name: securosys-registry }]
replicaCount: 2

# Set to true if Reloader operator is installed in your cluster
reloader:
  enabled: false

image:
  repository: securosys.jfrog.io/external-tsb/securosys-tsb
  pullPolicy: IfNotPresent
  tag: "latest"

strategy:
  type: RollingUpdate
  rollingUpdate:
    maxSurge: 1
    maxUnavailable: 0

##############################################################################################
# TSB Application Configuration
##############################################################################################
tsb:

  envFrom:
    - secretRef:
        name: tsb-db-credentials
    - secretRef:
        name: tsb-hsm-sensitive
    #- secretRef:
    #    name: tsb-sensitive
    #- secretRef:
        #name: tsb-tls-secrets

  # HSM Configuration
  hsm:
    attestationKeyName: "attestation-key"
    timestampKeyName: "timestamp-key"
    clusterFailoverGraceTimeMillis: 5000

  auth:
    apikeys: false  # requires secrets (keyManagementToken, keyOperationToken, ...)
    mtls: "none"    # Options: need, want, none (required the tls.truststorePath paremeter)

  # TLS Configuration - TSB terminates TLS, nginx must be configured as passthrough
  tls:
    enabled: false
    # Name of secret containing keystore.p12
    keystoreSecretName: tsb-tls-keystore
    keystorePath: /etc/app/tls/keystore.p12
    keystoreType: PKCS12
    keyAlias: tsb
    # TLS Protocols
    enabledProtocols: "TLSv1.2,TLSv1.3"

    # mTLS truststore path (only used if hsm.mtls is "need" or "want")
    truststoreSecretName: securosys-ska-truststore
    truststorePath: /etc/app/config/mtls/securosys-ska-truststore-server.jks
    truststoreType: JKS

  # Smart Key Attributes - TSB Workflow Engine
  workflowEngine:
    enabled: false # Enable the TSB Workflow-Engine, default disabled
    maxTimestampDiffApprovalClient: 600
    maxFutureTimestampDiffApprovalClient: 0
    hsmRequestsTimerServiceInterval: 60000
    hsmRequestsTimerServiceMinLock: 0
    hsmRequestsTimerServiceMaxLock: 30
    requestCleanupInterval: 5000      # SKA request database cleanup period in ms;
    requestCleanupBatchSize: 50       # The number of SKA requests to clean up simultaneously, older mySQL databases support limited number of batch-deleted

  # HSM Certificate Lookup
  hsmCertificateLookup:
    interval: '3600000'  # milliseconds
    minLock: 0
    maxLock: 600

  # Spring Configuration
  spring:
    hikari:
      maxLifetime: 180000
      maximumPoolSize: 100
    # File Upload
    multipart:
      enabled: false
      maxFileSize: 200MB
      maxRequestSize: 210MB

  # SpringDoc Configuration
  springdoc:
    swaggerUiEnabled: true

  # Server Configuration
  server:
    port: 8080
    tomcat:
      maxThreads: 100

##############################################################################################
# Resource Configuration
##############################################################################################
resources:
  limits:
    memory: "1Gi"
    cpu: "1000m"
  requests:
    memory: "1Gi"
    cpu: "1000m"

# autoscaling:
#   enabled: true
#   minReplicas: 2
#   maxReplicas: 5
#   targetCPUUtilizationPercentage: 70
#   targetMemoryUtilizationPercentage: 80

##############################################################################################
# Service Configuration
##############################################################################################
service:
  type: ClusterIP # ClusterIP
  port: 8080

##############################################################################################
# Nginx Sidecar Configuration (Passthrough Mode)
##############################################################################################
nginx:
  enabled: false
  # When passthrough: true, TSB must have TLS enabled (tsb.tls.enabled: true)
  # as NGINX forwards encrypted traffic directly to TSB
  passthrough: false
  # TLS secret name (only used when passthrough is false)
  tlsSecretName: tsb-nginx-tls

  service:
    type: ClusterIP    # Default to ClusterIP (use with Ingress). Options: ClusterIP, NodePort, LoadBalancer
    port: 8443
    # nodePort only applies when type is NodePort
    # nodePort: 30444

  loadBalancerAccess:
    enableStickySessionClientIp: false

##############################################################################################
# Extra Manifests - Inject custom Kubernetes resources
##############################################################################################
# extraManifests allows you to include additional Kubernetes resources
# that will be deployed alongside the TSB chart
extraManifests: []
# Example: Add a custom Ingress resource
# - apiVersion: networking.k8s.io/v1
#   kind: Ingress
#   metadata:
#     name: tsb-ingress
#     annotations:
#       cert-manager.io/cluster-issuer: letsencrypt-prod
#   spec:
#     ingressClassName: nginx
#     tls:
#     - hosts:
#       - tsb.example.com
#       secretName: tsb-tls
#     rules:
#     - host: tsb.example.com
#       http:
#         paths:
#         - path: /
#           pathType: Prefix
#           backend:
#             service:
#               name: tsb-nginx
#               port:
#                 number: 8443
#
# Example: Add a custom Secret
# - apiVersion: v1
#   kind: Secret
#   metadata:
#     name: custom-secret
#   type: Opaque
#   stringData:
#     key: value
Step 4: Deploy TSB
Deploy the TSB:
# Dry run to see what will be deployed
helm install tsb-server -n tsb-deployment -f tsb-default-values.yaml \
  oci://securosys.jfrog.io/charts/tsb --dry-run --debug

# Actually deploy
helm upgrade --install tsb-server -n tsb-deployment -f tsb-default-values.yaml \
  oci://securosys.jfrog.io/charts/tsb
Check the logs:
# Get running pods
kubectl get pods -n tsb-deployment -w

# inspect logs
kubectl logs -n tsb-deployment tsb-server-6d7957595d-sbb6h -f
Example successful setup:
...
2025.10.25 22:01:24.650 INFO  [main] [ka.service.business.HsmService] klausen.securosys.ch:2300:TSBDEV connected
2025.10.25 22:01:24.878 INFO  [main] [ness.controller.BaseController] PrimusHSM REST-API started: Vendor: Securosys SA, API Version: 2.8.12
To monitor the deployment and cluster, run the following:
kubectl get all,pvc,cm,secret -n tsb-deployment
The output will be similar to the following:
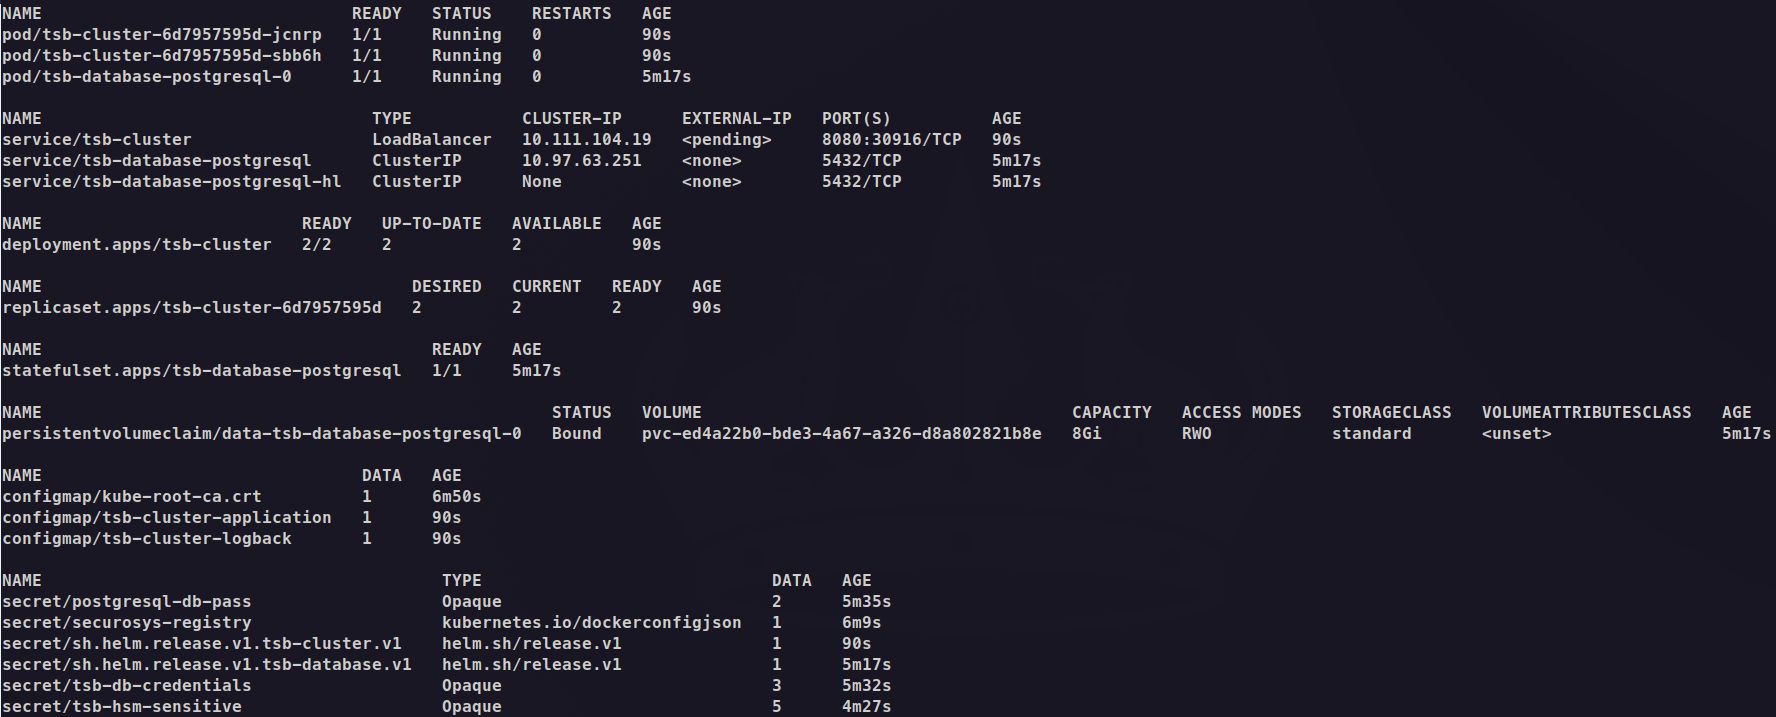
Note the following expected behavior:
-
Database pod is running: A single PostgreSQL pod (tsb-database-postgresql-0) is running as a StatefulSet, along with the tsb-database-postgresql service at 10.97.63.251:5432, which is used to connect TSB.
-
A Deployment named tsb-server is created: The deployment manages 2 replicas. Both pods are in the READY state (2/2).
-
Two pods are running:
- pod/tsb-server-6d7957595d-jcnrp contains the TSB application container and is in READY state (1/1)
- pod/tsb-server-6d7957595d-sbb6h is the second replica, also in READY state (1/1)
-
There is one services for TSB:
- tsb-server: ClusterIP service at
10.111.104.19:8080for internal communication
- tsb-server: ClusterIP service at
-
Access recommendations:
-
For local testing with minikube tunnel,
- you need to run
minikube tunnelin a separate terminal to assign anEXTERNAL-IPto the tsb-server service.
- you need to run
-
For local testing without minikube tunnel,
- for direct access, use:
kubectl port-forward svc/tsb-server 8080:8080 -n tsb-deploymentand go to http://localhost:8080 - for access via load-balancer follow Configure Load Balancer & TLS
and use:
kubectl port-forward svc/tsb-server-nginx 8443:443 -n tsb-deploymentand go to https://localhost:8443
- for direct access, use:
-
Step 5: Configure Load Balancer & TLS
Create the Certificate and Key
# Generate self-signed certificate (valid for 1 year)
openssl req -x509 -nodes -days 365 -newkey rsa:2048 \
  -keyout tls.key \
  -out tls.crt \
  -subj "/CN=tsb-server.tsb-deployment.svc.cluster.local/O=Securosys"

# Create the Kubernetes TLS secret
kubectl create secret tls tsb-nginx-tls \
  -n tsb-deployment \
  --cert=tls.crt \
  --key=tls.key

# Clean up local files
rm tls.key tls.crt
Update values.yaml:
##############################################################################################
# Nginx Sidecar Configuration (Passthrough Mode)
##############################################################################################
nginx:
  enabled: true # enable nginx load-balancer
  # Passthrough mode - nginx does NOT terminate TLS, just forwards to TSB
  passthrough: false
  tlsSecretName: tsb-nginx-tls

  service:
    type: LoadBalancer
    port: 443

  loadBalancerAccess:
    enableStickySessionClientIp: false
# 1. Deploy with Helm
helm upgrade --install tsb-server -n tsb-deployment -f tsb-default-values.yaml \
  oci://securosys.jfrog.io/charts/tsb

# 2. Wait for pods to be ready
kubectl get pods -n tsb-deployment -w

# 3. create a port-forwarding rule to access TSB outside of the cluster (give it some time...)
kubectl port-forward svc/tsb-server-nginx 8443:443 -n tsb-deployment
Access via REST API:
curl -k https://localhost:8443/v1/versionInfo
- LoadBalancer External IP: On Minikube,
- you need to run
minikube tunnelin a separate terminal to assign anEXTERNAL-IPto the tsb-server-nginx service. - Once assigned, verify that the endpoint is accessible via your browser at
https://EXTERNAL-IP:443.
- you need to run
Step 6: Configure Authentication
This section explains how to configure REST API authentication. You can enable authentication using either an API Key, mTLS, or both.
For more details, see the REST API authentication documentation.
Configure API Keys
For access control, you can require clients to provide API keys in the X-API-Key header of their requests.
For fine-grained access control there are different roles, see the
API key documentation for details.
Set the API key values that clients should provide:
kubectl create secret generic tsb-sensitive \
  -n tsb-deployment \
  --from-literal=api-authentication.keyManagementToken='change-me-key-management-secret' \
  --from-literal=api-authentication.keyOperationToken='change-me-key-usage-secret' \
  --from-literal=api-authentication.approverToken='change-me-approver-secret' \
  --from-literal=api-authentication.serviceToken='change-me-service-secret' \
  --from-literal=api-authentication.approverKeyManagementToken='change-me-approver-management-secret'
Update values.yaml, comment out tsb-sensitive:
  envFrom:
  ...
    - secretRef:
        name: tsb-sensitive
  auth:
    apikeys: true  # change this to true
# 1. Deploy with Helm
helm upgrade --install tsb-server -n tsb-deployment -f tsb-default-values.yaml \
  oci://securosys.jfrog.io/charts/tsb

# 2. Wait for pods to be ready
kubectl get pods -n tsb-deployment -w

# 3. create a port-forwarding rule to access TSB outside of the cluster (give it some time...)
kubectl port-forward svc/tsb-server-nginx 8443:443 -n tsb-deployment
Successful:
curl https://localhost:8443/v1/versionInfo -k -H "X-API-KEY: change-me-service-secret"
Unsuccessful:
curl https://localhost:8443/v1/versionInfo -k -H "X-API-KEY: wrong-api-key"

{ "errorCode": 631, "reason": "res.error.invalid.api.key", "message": "Invalid API Key" }
Configure mTLS
In Configure Load Balancer & TLS we set up a load-balancer, which terminates TLS and forwards HTTP requests to the TSB backend service.
In general, there are two ways of terminating TLS: either on the nginx sidecar or on the TSB directly. If the TSB is running in single-tenant mode, we recommend to terminate TLS on the TSB and configure mutual TLS. Therefore the nginx service needs to be configured as pass-through.
Setup Keystore and Truststore
Use the setup-mtls.sh script to create the keystore that contains the TSB's server certificate and private key for HTTPS and sets up the mTLS truststore. The script automatically creates Kubernetes secrets:
securosys-ska-truststore(the PKCS#12 truststore used for mTLS)tsb-tls-keystore(the keystore used for HTTPS)tsb-tls-secrets(keystore and truststore passwords)
Normally, you need the CA certificate that signed your TSB client certificates. This is typically provided by your PKI team.
Run the script:
chmod +x setup-mtls*.sh
./setup-mtls*.sh
Enable mTLS on TSB
Update the values.yaml:
  envFrom:
    ...
    - secretRef:
        name: tsb-tls-secrets # enable tsb-tls-secrets
  auth:
    mtls: "need"  # Options: need, want, none
  ...
  # TLS Configuration - TSB terminates TLS, nginx must be configured as passthrough
  tls:
    enabled: true # enable TLS on TSB
nginx:
  enabled: true
  passthrough: true # enable, Passthrough mode - nginx does NOT terminate TLS, just forwards to TSB
  tlsSecretName: tsb-nginx-tls
Restart the TSB:
helm upgrade --install tsb-server -n tsb-deployment -f tsb-default-values.yaml \
  oci://securosys.jfrog.io/charts/tsb

kubectl port-forward svc/tsb-server 8080:8080 -n tsb-deployment
Test the TSB:
- Wait for the entire service to be ready.
kubectl get pods -n tsb-deployment -w - The
<password>for the client.p12 was generated in the setup-tls.sh script, copy it!
# Connect sample with key and certificate
curl https://localhost:8080/v1/versionInfo -k --cert client.crt --key client.key

# Connect sample with p12
curl https://localhost:8080/v1/versionInfo -k --cert-type P12 --cert client.p12:<password>
Troubleshooting
Cleanup everything:
helm uninstall tsb-database -n tsb-deployment
helm uninstall tsb-server -n tsb-deployment
kubectl delete secret postgresql-db-pass -n tsb-deployment
kubectl delete secret tsb-db-credentials -n tsb-deployment
kubectl delete secret tsb-sensitive -n tsb-deployment
kubectl delete secret tsb-hsm-sensitive -n tsb-deployment
kubectl delete secret tsb-nginx-tls -n tsb-deployment
kubectl delete secret tsb-tls-keystore -n tsb-deployment
kubectl delete secret tsb-tls-secrets -n tsb-deployment
kubectl delete secret securosys-ska-truststore -n tsb-deployment
kubectl delete pvc data-tsb-database-postgresql-0 -n tsb-deployment
Install / Update the helm chart:
helm upgrade --install tsb-server -n tsb-deployment -f tsb-default-values.yaml \
  oci://securosys.jfrog.io/charts/tsb
Access a graphical UI for troubleshooting:
minikube dashboard