Quickstart
To get started with the REST API, you need an HSM and a Transaction Security Broker (TSB). The TSB provides the REST API.
Afterwards, you can start making requests to the REST API.
Setup
Get an HSM
- CloudHSM
- On-premise
CloudHSM is a hosted offering from Securosys, where Securosys manages the HSMs for you in a geo-redundant cluster.
For testing purposes, CloudHSM offers a free 90-day trial.
Contact the Securosys Sales team to purchase a Primus HSM. There are various models available.
Your Primus HSM needs to be configured as follows:
- Device setup completed with the initial wizard
- Root Key Store set up
- Enabled features in the security config:
Client API access,JCE,Key Authorization,REST API access,TSB Workflow Engine. Note that this needs to be enabled both on a device-level and on a partition-level. - Created at least one user partition
See the TSB installation guide for step-by-step explanations.
Get a Transaction Security Broker
- CloudHSM
- On-premise
CloudHSM offers TSB-as-a-service. Depending on the service package, the TSB option may be included or may need to be manually enabled.
Follow the TSB documentation to install and configure the TSB on your infrastructure.
REST API URL
Select your TSB instance and note down the REST API URL. Use this base URL in all subsequent HTTP requests.
| Environment | REST API URL |
|---|---|
| CloudHSM | https://rest-api.cloudshsm.com |
| CloudHSM Sandbox | https://sbx-rest-api.cloudshsm.com |
| Developer Program | https://primusdev.cloudshsm.com/ |
| On-premise TSB | http://localhost:8080 |
Unsure? See the connectivity details or use the details in the credentials file received during onboarding.
Authentication
In CloudHSM, you should have received a JWT token to authenticate against the REST API (and hence against your HSM Partition), Pass this token in all of your API requests as shown below.
For on-premise TSB deployments, your administrator can configure API authentication. Contact them for details.
- CURL
- Swagger
curl "https://sbx-rest-api.cloudshsm.com/v1/versionInfo" \
  -H "accept: application/json" \
  -H "Authorization: Bearer <JWT_TOKEN>"
Response:
{
  "Version": "2.8.12",
  "Vendor": "Securosys SA"
}
-
Click
Authorize
-
Enter the
JWT-Token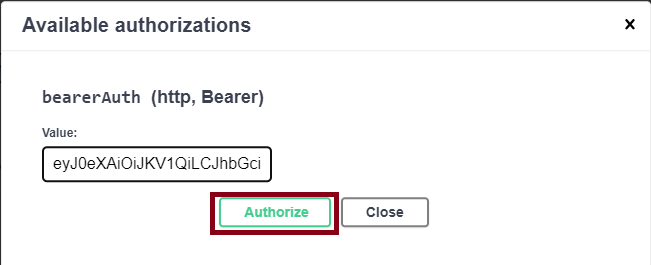
-
Click
Authorizeand thenClose -
Navigate to the API section
Service Information -
Click on
/v1/versionInfo,Try-OutandExecute
Response:
{
  "Version": "2.8.12",
  "Vendor": "Securosys SA"
}
Example: Create an RSA Key
This section shows how to use the REST API to create an RSA key and perform a signing operation with it.
POST: /v1/key
Key Parameters
| Parameter | Description |
|---|---|
| label | The label of the key to be generated. |
| algorithm | The algorithm of the key. See the supported algorithms. |
| keySize | The size of the Key. Applicable for RSA, DSA, ISS and Symmetric algorithms. |
| curveOid | Needed if algorithm is EC or ED. See the supported curveOids. |
For an overview of the attributes, see this list.
- CURL
- Swagger
- Replace
<JWT_TOKEN>(CloudHSM only, remove otherwise) - Replace
<keyname>
Request:
curl "https://sbx-rest-api.cloudshsm.com/v1/key" \
    --header 'Authorization: Bearer <JWT_TOKEN>' \
    --header 'Content-Type: application/json' \
    --data '{
    "label": "<keyname>",
    "algorithm": "RSA",
    "keySize": 2048,
    "attributes": {
        "sign": true,
        "extractable": false,
        "modifiable": true,
        "destroyable": true,
        "sensitive": true,
        "decrypt": false,
        "unwrap": false
    }
}'
Response:
{
"xml": "<xml-formatted attributes of the key>",
"json": {
    "label": "...",
    "id": null,
    "algorithm": "RSA",
    "algorithmOid": "1.2.840.113549.1.1.1",
    "curveOid": null,
    "keySize": 2048,
    "createTime": "2021-02-24T15:10:03Z",
    "attestTime": "2021-02-24T15:10:03Z",
    "publicKey": "MIIBIj...AB",
    "addressTruncated": null,
    "attributes": {
    "decrypt": false,
    "sign": true,
    "ekaSign": null,
    "unwrap": false,
    "derive": false,
    "sensitive": true,
    "alwaysSensitive": true,
    "extractable": false,
    "neverExtractable": true,
    "modifiable": true,
    "copyable": true,
    "destroyable": true
    },
    "policy": null
},
"xmlSignature": "<base64-encoded-signature>",
"attestationKeyName": "attestation-key"
}
- Navigate to the API section
Keys - Click on POST /v1/key
- Click the button Try it out
- Set the request-body:
Request:
{
  "label": "<keyname>",
  "algorithm": "RSA",
  "keySize": 2048,
  "attributes": {
      "sign": true,
      "extractable": false,
      "modifiable": true,
      "destroyable": true,
      "sensitive": true,
      "decrypt": false,
      "unwrap": false
  }
}
Response:
{
"xml": "<xml-formatted attributes of the key>",
"json": {
    "label": "...",
    "id": null,
    "algorithm": "RSA",
    "algorithmOid": "1.2.840.113549.1.1.1",
    "curveOid": null,
    "keySize": 2048,
    "createTime": "2021-02-24T15:10:03Z",
    "attestTime": "2021-02-24T15:10:03Z",
    "publicKey": "MIIBIj...AB",
    "addressTruncated": null,
    "attributes": {
    "decrypt": false,
    "sign": true,
    "ekaSign": null,
    "unwrap": false,
    "derive": false,
    "sensitive": true,
    "alwaysSensitive": true,
    "extractable": false,
    "neverExtractable": true,
    "modifiable": true,
    "copyable": true,
    "destroyable": true
    },
    "policy": null
},
"xmlSignature": "<base64-encoded-signature>",
"attestationKeyName": "attestation-key"
}
Example: Sign a Payload with the Key
POST: /v1/synchronousSign
Sign-Payload Parameters
| Parameter | Description |
|---|---|
payload | The data for which you want to create a digital signature. It should be encoded using base64 |
signKeyName | The label or identifier of the key stored within the HSM. This key is used for generating the digital signature. |
signatureAlgorithm | Specifies the algorithm used for generating the digital signature. In this case, it's SHA256_WITH_RSA_PSS, indicating that SHA256 is used for hashing the payload and RSA with PSS padding scheme is used for signing. |
- CURL
- Swagger
- Replace
<JWT_TOKEN>(CloudHSM only, remove otherwise) - Replace
<payload>and<signKeyName>
Request:
curl "https://sbx-rest-api.cloudshsm.com/v1/synchronousSign" \
--header 'Authorization: Bearer <JWT_TOKEN>' \
--header 'Content-Type: application/json' \
--data '{
    "signRequest": {
        "payload": "<payload>",
        "signKeyName": "<signKeyName>",
        "signatureAlgorithm": "SHA256_WITH_RSA_PSS"
    }
}'
Response:
{"signature":"rF43P3iGgCvUZnoFY3+Qmyc8zxdydJ7RKcrQ+eQM4eM+7FmlAMAIOw9h2ae+/On4hyRY/VT/9SLMVe1UU/J1gIp9giX9zr3ycYBZ8r5l9wYuh1HVv5J9YX478ppLI6DoHQSw/8cxEPFzB2dZLmov5g51nJI9qvd8qJjgwYd/iYhAN9Vf7XlSa9LhoL/73ZOR3JSb68pWlfXVXIhN0ShaIoduE9ba+2Z7QkNG0bSXjS1j8tI9LiYLfBX2yEYyJgBaNFlBGI5EdlblxXMgNzBk3IMpQIPMYZ06N/3amIL+x46bb74ERZMGYcg0TXlEMd4KQTFD6wtUhkmOFCbRnDaq2w=="}
- Navigate to the API section
Synchronous Key Operations - Click on POST /v1/synchronousSign
- Click the button Try it out
- Set the request-body
Request:
{
    "signRequest": {
        "payload": "<payload>",
        "signKeyName": "<keyname>",
        "signatureAlgorithm": "SHA256_WITH_RSA_PSS"
    }
}
Response:
{
"signature": "A4Jw63iLqG4gj6lyxi+BxDA4QtlN3PHQGk6BeCmd0zrt4OFn56v0XKQqa4sZ73ukeNSa0c1VcMPT0U6fe1Lt7DCNK9CTeerbanwtEkvGnmTFXt8FyOMABppeNCbLdcDzr7u7in+9jDdQzw0/Q+lVF/4lLFA9QykTtYNh7p+7a9QSv2ZucNCjAK0ief95Kb9KuJ6SjyV4jeiI8yIsliH/TLjfMswCa+Bmyq53c3QdcHkJDypm3riUHOCXAPn1YpwjwNPy9KFR+0Hyhf2MI2ar051J4F+/zooYjYJHYggYBnJ6LyOShudXOIH4UKjsgt2tkrMHSCHcnsappRgq4oRQ+Q=="
}
What's next?
- Learn about the different authentication options that the REST API supports.
- Explore the Swagger-style REST API documentation.
- Explore the tutorials (for example, on PQC) to learn about more TSB functionality.
- Use Smart Key Attributes (SKA) and the TSB workflow engine to build multi-authorization flows.